A deep, rich black was exactly what a Canadian retail client wanted for their matte pouches, but the desired shade remained difficult to match. The client approached Universal Packaging to achieve the precise black they had been searching for. Multiple CMYK colour combinations were tested, and the printing process was refined until the desired deep black was achieved. This Black CMYK For Print case study covers the client’s requirements, colour-matching challenges, printing experiments, customisation process, and final results. Scroll down to explore the complete case study, discover the colour-matching process, and learn how the right CMYK values help achieve a consistent, rich black finish in print.
Black CMYK for Print: Client Background
The project was started with a short call, a sample pouch, and a clear request. The requirements were documented for the black CMYK for print project.
Retail Client from Canada
The client is a retail business owner based in Canada. A premium black packaging design was planned for the full range, and a dark matte surface was selected so the pouch itself would make the first impression on the customer. The pouches were kept completely plain, without text, a logo, or a brand name, so the black colour alone had to represent the brand. However, the client had another requirement: a stand-up base, which was also noted during the discussion. Explore Stand Up Pouches Food Packaging to learn more about this practical pouch style. These specifications were also considered during the black CMYK for print review.
Black Matte Pouch Printing Requirements
The requirements listed by the client are the basis of this black CMYK print case study:
- Colour: a deep, solid black over the full surface of the pouch
- Finish: a smooth matte finish after lamination
- Match: the exact shade of black that was pictured by the client
- Consistency: the same black in every batch, including repeat orders
- Size and Shape: A rectangular pouch was planned in the specified dimensions to match the client’s requirements of packaging. For alternative shapes and designs, explore Custom Shaped Bags to find a suitable option for your product range.
The reputation of the brand depended on one consistent dark colour, making brand colour consistency the first priority. Heat-sealed edges were requested for the initial pouches, while gusseted options were also considered for larger sizes. Learn more about Gusseted Mylar Bags for additional storage capacity and a practical packaging format.
Client Request and Previous Feedback
The following feedback was shared during the first call: “The black was grey on some pouches and dark black on others. We looked everywhere, but the black we wanted could not be found.” This answer was not accepted as normal. The request was simple: a black that is the same on every pouch, from the first order to the last. A customized black was therefore promised, and it was built from tests instead of guesses. This promise became the centre of the black CMYK for print project. The same focus guided the black CMYK for print testing process.
Why Black Is Difficult in CMYK Printing?
Black looks like the simplest colour, but it is one of the hardest colours to control on flexible packaging.
How the CMYK Colour Model Produces Black
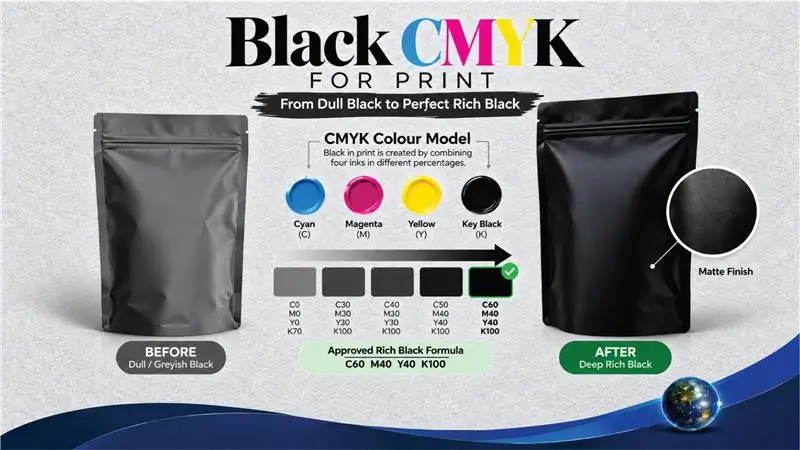
The CMYK colour model is designed on four inks: cyan, magenta, yellow and key (black). Every other colour is created by mixing these inks in different percentages, but black is created in two different ways. A choice between these two methods is made in every black CMYK for a print job, and a wrong choice is shown clearly on a large plain surface. The right formula depends on the material, finish, and desired colour depth, making the selection of black CMYK for printing an important step.
Why Plain Pouches Show Every Error
Nothing distracts the eye on a plain pouch. There is no text, no logo, and no pattern, so every shade difference, streak, or colour cast is noticed at once. On a printed pattern, a small variation is hidden. On a solid black surface, the same variation is seen from across the shelf. For this reason, the black CMYK for print process was treated as the most important step of the whole project.
Why Matte Film Changes the Black
Light is scattered across a matte surface, so the black is seen as lighter than the same black on a glossy surface. A black that looked deep on the screen and on the proof was therefore found to be grey after matte lamination. This effect was not understood by the earlier printer, and it was not corrected before the full run was started. Therefore, black for print CMYK values are tested on the actual matte film before final production.
Common Problems of black CMYK for Print
Two groups of problems were found when the first pouches were examined.
Dull and Washed Out Black Print
The first problem was a dull and washed-out black. This issue was reviewed as part of the black CMYK for print assessment. Under shop lighting, the surface was grey, and the large panels were uneven. The ink density was too low, and solid black ink coverage was not reached.
Colour Cast in Mixed Black
The second problem was a colour cast. A brownish tone was seen on some pouches and a bluish tone on others, because the cyan, magenta, and yellow in the mix were not balanced. As a result, the same artwork looked different from batch to batch. Colour consistency in printing was also not monitored between batches. The correct black CMYK for print values were reviewed alongside the cyan, magenta, and yellow balance to maintain neutral black tones and consistent colour reproduction. On some pouches, black ink smudging was noticed near the seals, because the ink drying time was too short before lamination.
Customizing the Black: CMYK Mix Experiments
The client’s black was not found in any standard swatch, so it was built step by step. The testing sequence formed a key part of the black CMYK for print process. This customization is the heart of this black CMYK for print case study.
Testing Different CMYK Mix Quantities
Five black swatches were printed on the real matte film and placed side by side. In each swatch, the quantity of cyan, magenta, and yellow was changed under a full black plate, while the black was kept at 100%. Therefore, black for print CMYK values are tested on the actual matte film before final production.
| Test | CMYK values | Total ink | Result |
| 1 | K100 only | 100% | Flat and greyish on large areas |
| 2 | C40 M30 Y30 K100 | 200% | Deeper, but still slightly light |
| 3 | C50 M40 Y40 K100 | 230% | Close, with a faint warm tone |
| 4 | C60 M40 Y40 K100 | 240% | Deep, neutral and even |
| 5 | About C75 M68 Y67 K90 | About 300% | Uneven, with slow drying |
How Each Experiment Was Judged
Every swatch was judged under three types of light: daylight, shop lighting and warm retail lighting. The first swatch looked flat in all three. The second was deeper, but a slight lightness was still seen under shop lighting. The third was close to the wanted black, but a faint warm tone was noticed in daylight. The fifth was rejected because the colour was uneven and the drying was slow. After these comparisons, the fourth swatch was found to be the most neutral and the most even. This result was recorded for the black CMYK for print reference.
Final Rich Black Formula
Test 4 was selected by the client. A rich black colour formula of C60 M40 Y40 K100 was approved, with a total ink of 240%. The difference between rich black vs pure black was shown with printed swatches: pure black is flatter on large areas, while rich black is deeper and denser. The formula was then recorded as the authentic black of the brand. The approved CMYK black for print formula was recorded in the job sheet for consistent results across repeat orders.
Total Ink Limit Explained
The total ink limit is the sum of all four ink percentages at one point of the artwork, also known as TAC (total area coverage). For the film that was used, a limit of 280% was set. If this limit is passed, the drying is slowed, and smudging is seen at the seals. The limit is set before the cylinders are engraved. This check is important in the black CMYK for print workflow.
Other Black colour Samples Shown
Best Black CMYK for Print Values Compared
| Black type | CMYK values | Total ink | Recommended use | Main risk |
| Single black | K100 only | 100% | Light coverage only | Flat tone on large areas |
| Rich black | C60 M40 Y40 K100 | 240% | Large solid areas | Needs a controlled ink limit |
| RGB conversion mix | About C75 M68 Y67 K90 | About 300% | Not recommended | Uneven colour, slow drying |
| Registration black | C100 M100 Y100 K100 | 400% | Crop marks only | Heavy ink load |
This chart is a quick reference for the black CMYK for print case study on flexible film. It supports the black CMYK for print comparison across common black types.
Gravure Printing Process
The choice between offset and gravure printing depends on the packed material, print volume, and desired finish. Understanding the differences between these methods is especially useful for maintaining consistent black coverage on printed pouches. These considerations were included in the black CMYK for print production review. Explore the guide to Offset Gravure Printing to learn more about their applications and print quality considerations.
Gravure Black Cylinder Setup
A separate cylinder was engraved for black, with deeper cells to carry a dense, even layer of ink on the large solid areas. For gravure printing black ink, the viscosity was checked at regular intervals, and colour calibration of the press was carried out before approval. The settings for black for flexible packaging were recorded in a job sheet, because black behaves differently on different flexible packaging substrates. Discover Custom BOPET Bags to learn about one of the films that was tested.
Matte Lamination for Deeper Black
A lighter black is noticed after matte lamination because light is scattered across a matte surface. A deeper black was therefore set before lamination, and glossy and matte finishes were compared on the same print. The same test was repeated for printing on paper and cardstock used for hang tags. Coated and uncoated paper needed different adjustments, and kraft paper printing was tested for a future eco range. Recyclable printed packaging was also discussed, along with recycling-friendly printing inks. For a similar matte finish with custom branding, explore Custom Smell Proof Bags With Your Logo.
Test Print and Final Approval
Print proofing was done in two stages: a digital proof for layout, and a press proof on the real film. The black was measured with a densitometer, and the swatch was checked under different lights. A final approval was signed by the client, and the signed sample was kept as the reference for every later batch. The signed sample became the black CMYK for print colour reference. Explore this final Gravure Printing Packaging Solution to see a pouch style that is approved through the same proof steps.
Canadian Packaging Rules and Regulations
Canadian packaging requirements should be considered alongside print quality, product protection, and labelling needs. These checks form part of the wider black CMYK for print planning process. For food pouches, relevant requirements include the Food and Drugs Act (R.S.C. 1985, c. F-27), the Food and Drug Regulations (C.R.C., c. 870), and the Safe Food for Canadians Regulations (SOR/2018-108), where applicable. Bilingual English and French labelling, nutrition facts, and substantiated Made in Canada claims should also be reviewed according to the applicable rules. In this black CMYK for print case study, colour consistency and sharp print details were the main priorities, while regulatory compliance remained an important consideration for packaging intended for the Canadian market.
Results After Fixing black CMYK for print
The black CMYK for print adjustments improved colour accuracy, print consistency, and client confidence, resulting in approval and repeat orders.
1. Required Black Colour Accomplished
The desired deep, even black was achieved across the pouches, and the client approved the print quality without changes.
2. Consistent Colour Across Every Batch
Three batches were checked, with readings within the agreed tolerance. The approved CMYK values were recorded for consistent future production.
3. Repeat Order from the Client
A repeat order was placed within the same season, and new sizes were added, reflecting the client’s confidence in the improved print quality. The repeat order marked a positive outcome for the black CMYK for print project.
The visibility of the product on the shelf is improved through a darker, cleaner pouch, and the perception of the brand is strengthened with every order. Learn more about Flexible Customized Pouches planned for the next stage. This method is the story told in this black CMYK for print case study.
Planning packaging for your next product range? Explore our Custom Packaging solutions to discuss suitable materials, print finishes, and packaging specifications for your project. Share your requirements with our team and contact us today to get your packaging project started.
Conclusion
The problem faced by the client was not caused by the press alone. A black that matched the brand could not be found in standard swatches, so it was designed through careful CMYK mix experiments. Once the conversion errors were removed, the rich black was tested and fixed at C60 M40 Y40 K100, and the total ink limit was respected; the black was deep, even, and steady. This is the main lesson of the black CMYK for print case study. The quality of the product is protected, and the reputation of the brand is strengthened when the black is planned before the first cylinder is engraved.
Frequently Asked Questions (FAQs)
What is the best black value for large solid areas?
A rich black, such as C60 M40 Y40 K100, is recommended for large areas on matte film. The final mix is confirmed through test swatches on the real material.
Why is CMYK black different from RGB black?
RGB black is built from light on a display, while CMYK black is built from ink. When RGB 0, 0, 0 is converted automatically, a four-ink mix is created that is not stable on press.
What total ink limit is used for black matte pouches?
In this project, a limit of 280% was set for the film. The limit is confirmed by the printer for each film, so the value should be checked first.
How was the client’s exact black matched?
Five CMYK mix swatches were printed on the real film, and the closest one was selected by the client. The selected formula was then recorded in the job sheet for every batch.
Why is black lighter after matte lamination?
Light is scattered across a matte surface, so the black is seen as lighter. A deeper black is therefore set before lamination.
Is the method of the black CMYK for print case study followed in other print processes?
The same logic is followed in digital and offset printing, but the black values are adjusted for each process. A separate test is made on the real material first.
When should the black values be fixed in a project?
The values should be fixed before the cylinders are engraved or the plates are made. After that point, any change is costly.