All Day Coffee, a Canadian coffee brand, came to us wanting its pouch to stand on the shelf, but the pouch was flat, so a stand up pouch was suggested first. The first sample was then produced with a full strategy, yet the real story began when dot defects were found in it, and the gravure printing cylinder was checked before the press was blamed. In this gravure printing cylinder blog, the problems of the first sample, the gravure printing cylinder making process, the different kinds of cylinders and their roles, the update, the second sample, and the results are explained step by step. So, learn more by scroll further.
Client Demand: Stand Up Pouch Printing for Shelf Display
All Day Coffee brand approached Universal Packaging for custom flexible packaging with a detailed dotted pattern, smooth colour gradients, and consistent brand colours across a large production run. The flat pouch used earlier was not held upright on the shelf, and the artwork was hardly seen by customers, so the stand-up style was recommended. Explore Custom Printing Stand Up Pouches, the style that was suggested to this client for shelf display. Accurate fine details were required, so gravure printing cylinder engraving was treated as an important part of the printing setup. Wave bands in brown, purple, tan, and red, a sunburst, a gauge dial, and tiny text for the caffeine level and net weight were planned, and brand colour matching was needed, so the reputation of the brand was protected. A resealable zipper and a clean matte finish were also requested.
First Sample Problems
After the first pre-production sample was printed on a matte laminated film, some dots appeared uneven, and certain fine details were less distinct than expected. Before mass production was approved, the engraved cells were inspected, and ink transfer, ink conditions and press settings were evaluated. Three issues were recorded:
- Soft edges on small text: Thin letters under the dial were not reproduced cleanly, and the quality of the product was judged lower than expected.
- Uneven dots in the wave bands: Under magnification, the halftone dots in the tan and purple bands were seen to be irregular, so colour consistency was not achieved between the two variants.
- Broken dial lines and gaps: Fine dial lines and sunburst rays were broken, and small gaps were seen where two colours met.
The soft edges were seen most clearly on the black text, so the way black is built in print was questioned next. Learn more about Black CMYK For Print, which is explained in a separate guide, because the thin black text and dial lines were built from more than one ink, so a small shift between the cylinders was seen as a soft edge.
A press setting was blamed first, but a different reason was found when the gravure printing cylinder was reviewed.
Gravure Printing Cylinder Making Process Explained Step by Step
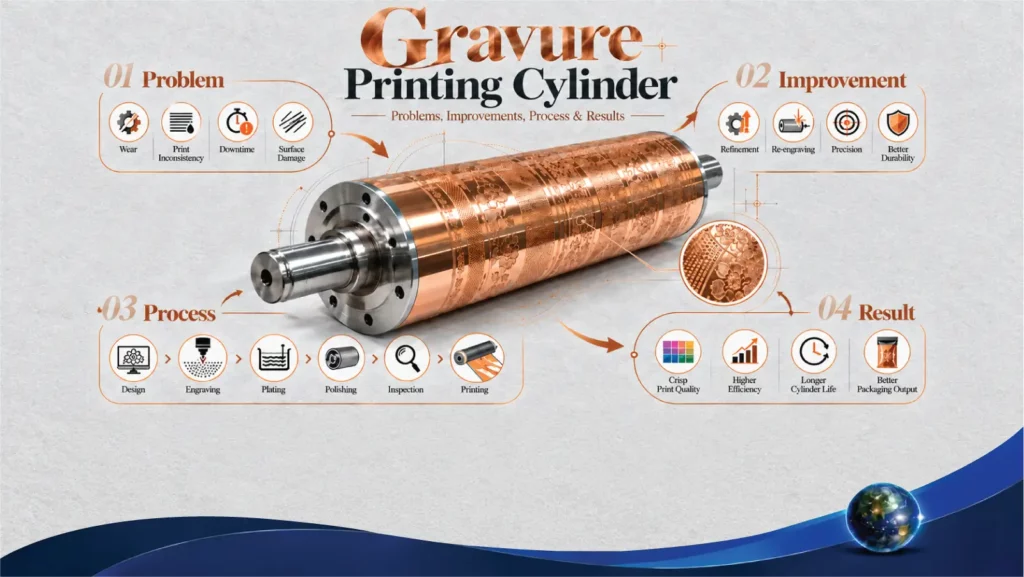
The gravure printing cylinder transfers ink to the film through millions of tiny engraved cells. The process involves five main steps.
Step 1: Steel Base Preparation
A steel base is prepared to form the foundation of the gravure printing cylinder.
Step 2: Copper Plating
A copper layer is applied to the steel base to create a smooth surface for engraving the artwork.
Step 3: Cylinder Engraving
The artwork is engraved into the copper surface, with a separate cylinder prepared for each colour.
Step 4: Chrome Plating
A thin chrome layer is applied to resist wear and protect the engraved surface during printing.
Step 5: Ink Transfer
Ink is deposited into the tiny engraved cells of the gravure printing cylinder, while excess ink is removed by a doctor blade. Under impression pressure, the remaining ink is transferred onto the film to reproduce the required artwork. The depth and volume of each engraved cell determine the amount of ink transferred, influencing colour intensity and print consistency.
The making process is started with a steel tube, and each step is recorded:
- Balancing: The steel base is balanced, because runout is noticed on the press as banding.
- Copper plating: A layer of copper is plated on the steel base.
- Grinding and polishing: The copper is ground until a smooth surface is reached.
- Engraving: Cells are cut by electromechanical engraving with a diamond stylus, or by laser engraving for very fine work.
- Chrome plating: A thin chrome layer is applied, so the cells are protected.
- Proofing: The cells are checked before the cylinder is sent to the press.
Once proofing is finished, the cylinder is sent to the press, and the next question is how the printed film becomes a finished pouch.
Why the Dots Appeared?
When the printing defects were compared with the gravure printing cylinder specifications, three causes were identified. Uneven cell depth in the colour bands resulted in inconsistent ink transfer and irregular dots. Coarse screen ruling affected the reproduction of fine details, resulting in soft edges. Slight roughness in the chrome layer was also identified, contributing to faint streaks in the tan band.
Kinds of Gravure Printing Cylinder and Their Roles
Different kinds of cylinders are used in gravure, and a different role is played by each of them. Each kind is related to this case in the table below.
| Kind of cylinder | Role in gravure | Relation to this case |
| Copper-plated engraved | The artwork is engraved on the copper layer as tiny cells | Uneven depth was found here |
| Chrome-plated | The cells are protected from wear by a thin chrome layer | A rough layer caused faint streaks |
| Ceramic-coated | Longer runs are expected, because wear is resisted by the hard coating | Considered for yearly repeat orders |
| Electromechanical-engraved | Cells are cut by a stylus for steady, general work | Used for the large wave bands |
| Laser-engraved | Very fine cells are formed for small text and thin lines | Selected for the text and the dial |
Also get the Flat Bottom Gusset Bags, the style that was compared by the client for the premium coffee range.
How the Gravure Printing Cylinder Was Improved for Sharper Print
The gravure printing cylinder was adjusted to improve ink transfer and print quality. The depth of the cells in the colour bands was corrected, so an even ink laydown was achieved. The engraving resolution was raised, and a finer ruling was selected for the small text and the dial. Thin lines had been engraved with shallow and broken cells, so the dial and the rays were re-engraved with higher accuracy. The black of the small text and the dial lines was also reviewed, and a single dedicated black cylinder was used instead of a mix of four inks, so small shifts between the cylinders no longer softened the edges. The cylinders were polished again, a fresh chrome layer was applied, and cleaning was reviewed, because dried ink had been left in a few cells.
| Area reviewed | Issue found | Improvement made |
|---|---|---|
| Small text | Soft edges | Finer ruling, higher resolution |
| Colour bands | Uneven dots | Depth corrected |
| Dial and rays | Broken lines | Re-engraved accurately |
| Cylinder surface | Faint streaks | Polished, fresh chrome layer |
If the gravure printing cylinder is not reviewed, the same defects are repeated in every batch, so troubleshooting is started at the cylinder, and the press, the ink, and the film are checked afterwards.
Explore Custom Shaped Bag designs, which were requested by the client for a later launch.
Gravure Printing Cylinder Checklist Before the Second Sample
Before the second sample was started, the following checklist was completed for every cylinder:
- Artwork: Fine text and thin lines were marked clearly in the file.
- Ruling and depth: A finer ruling was selected for small details, and the depth was matched to solid areas.
- Surface: Polishing and the chrome layer were inspected.
- Proofing: A proof was approved before engraving.
- Cleaning: The cylinders were cleaned after each run.
- Records: The approved cylinders were labelled and stored.
A digital proof was approved first, and the cylinders were engraved again only after approval. Each cylinder was checked under magnification, and the registration marks were verified. Ink viscosity was checked at regular intervals, and the blade pressure was set to match the new cells, so high-speed printing was started only after the first pouches were approved.
Learn more about Custom Smell Proof Bags With Your logo, which were chosen for keeping the coffee fresh.
Results After Gravure Printing Cylinder Improvements
The second sample was reviewed by the client, and the change was clearly noticed. The small text was sharp, the wave bands were smooth, the dots were even, and the dial lines were continuous. The artwork was reproduced accurately on both variants, and the perception of the brand was strengthened on the shelf. Because the approved gravure printing cylinder was stored as the reference, repeat-job consistency was achieved, and the presentation of the product was improved when the stand up pouches were displayed upright. Gravure was also compared by the client with screen and UV printing, and gravure was kept for this range because of the sharper detail and steadier colour. A repeat order was placed after approval.
For sticker designs on Mylar bags, digital printing was also discussed as a suitable option. Discover Sticker Bags, where digitally printed sticker designs are used to create a distinctive look for the next launch.
From Printed Film to Finished Pouch
After approval, the next question for the client was how the printed film is turned into pouches. The printed roll is laminated, slit into narrower rolls, and converted on a pouch making machine, where the film is folded, sealed, and cut. The zipper and tear notches are added, and the seal strength is tested before packing. Explore Flexible Pouches For Food With Gusset, which were compared for food-grade needs.
Sustainable Production Compliance
Greener choices were also discussed for cylinder production. Through copper recovery and recycling, old copper layers are returned to use, metal waste is recovered, and a life-cycle assessment is carried out. Recyclable mono-material structures are considered for the pouch, and compliance is checked against the Food and Drugs Act and the Safe Food for Canadians Regulations, with English and French labelling planned. Learn more about BOPET Plastic Bags, which are used as a barrier layer in the laminated structure.
“Customers will occasionally buy products not because they want them but because of how they are presented to them. — James Clear”
Canadian Food Packaging Regulations and Labeling Requirements
Canadian coffee pouch packaging should comply with applicable food-contact safety and labeling requirements. Under Section B.23.001 of Canada’s Food and Drug Regulations, food must not be sold in packaging that may transfer substances harmful to consumers. Mandatory information on most consumer-prepackaged food materials with labels must also appear in English and French under the applicable provisions of the Safe Food for Canadians Regulations (SOR/2018-108) and the Food and Drug Regulations. The final pouch materials and label details should be reviewed according to the coffee product and its intended market.
Review the Long Impact Experience
The problem faced by the client was not caused by the press alone. It was found in the cylinders, and the improvements were identified only after a careful review. Once the depth, the ruling, the engraving accuracy, and the surface were corrected, a sharp and steady result was achieved. This is the main lesson of this gravure printing cylinder case study: the quality of the product is protected, and the reputation of the brand is strengthened when the gravure printing cylinder is reviewed before the full run is started. Contact Universal Packaging to have your artwork, order volume, and budget reviewed.
“Good things come in small packages”. — Aesop
Conclusion
We discussed how gravure printing cylinder defects affected the first coffee pouch sample and how careful inspection helped identify the causes of uneven dots, soft text, and broken dial lines. By correcting cell depth, engraving resolution, and the chrome surface, a sharper second sample was approved by the client. This case study highlights the importance of cylinder accuracy, consistent ink transfer, and quality checks in flexible pouch printing. Proper cylinder maintenance and print verification remain essential for consistent results across repeat orders and accurate reproduction of detailed coffee pouch artwork.
Frequently Asked Questions (FAQs)
What is a gravure printing cylinder?
It is the main part of the machine. The artwork is engraved on a plated surface as tiny cells, and ink is held in these cells before it is passed to the film.
How long does a gravure printing cylinder last?
Long runs are expected when the cylinder is cleaned, stored and handled properly. The approved cylinders are kept as the reference for repeat orders.
Which cylinder feature affects small text sharpness?
The sharpness of small text is decided by the fineness and the accuracy of the engraving. When the cells are too coarse, the edges of thin letters are seen as soft.
How does chrome plating protect the cylinder?
A thin chrome layer is applied to protect the copper from wear. The layer is polished so that a smooth surface is kept and streaks are avoided.
Which pouch style is suitable for shelf display?
The flat pouch was not held upright on the shelf, so the artwork was hidden. A stand up pouch was suggested so that the front panel is displayed clearly.
What was the main finding of this gravure printing cylinder?
The problem was found at the source, in the cylinder, and not only on the press. After the improvements, the same sharp result was received in every batch.
Where can businesses order personalized gravure printed pouches?
Personalized pouches are offered by packaging suppliers that work with proofs and sampling. Universal Packaging is contacted with the artwork, the order volume and the budget, so a free sample and cost comparison are received.