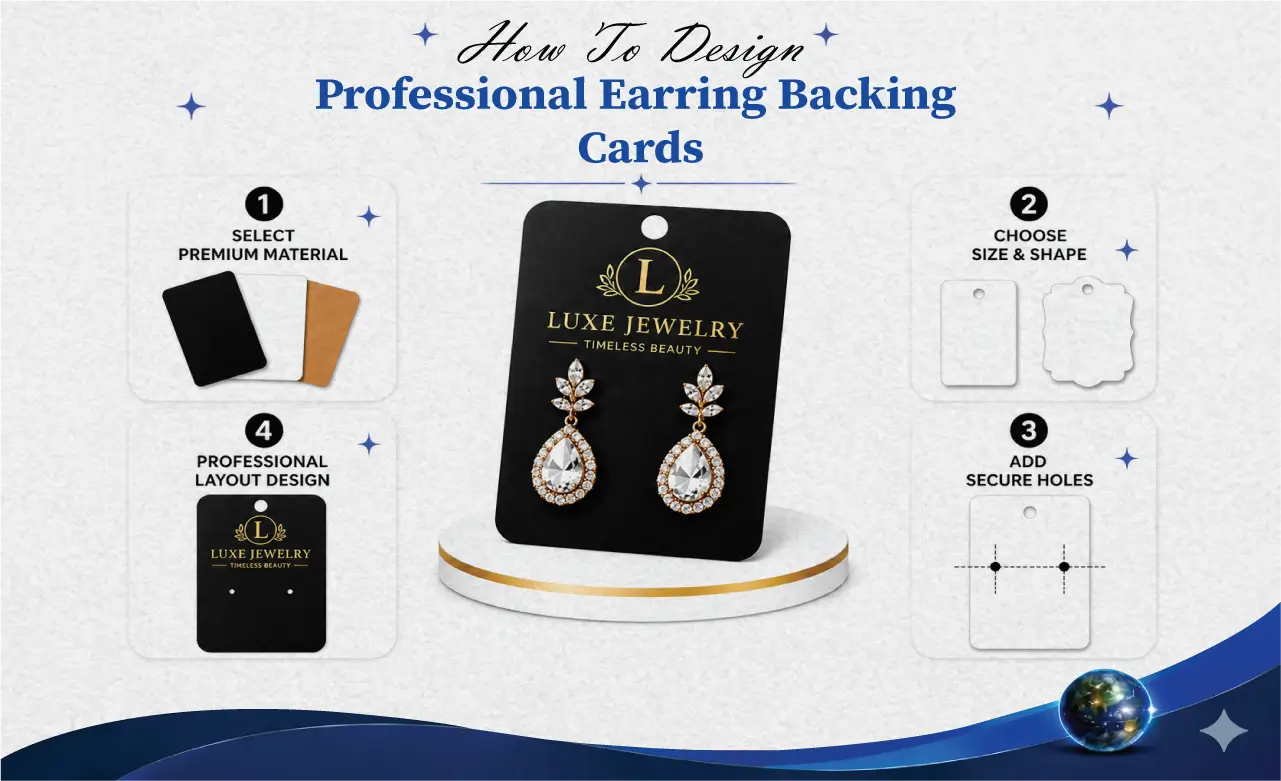
Imagine two similar pairs of earrings displayed side by side, yet one instantly looks more expensive than the other. That difference is rarely created by the jewellery, commonly, it is created by the small card holding it in place. It is often the smallest details that are responsible for turning a simple display into a memorable one. But first, let’s understand How To Design Professional Earring Backing Cards. Dive in to uncover the eight steps that turn a simple card into a professional solution.
Step 1: Choose Perfect Size And Shape
The size and shape of a card are decided first because everything else is around it. A common size for small earrings is 2 inches by 3.5 inches, while a slightly smaller card is 2 inches by 2 inches. A rectangular shape is kept simple and is easy to design, while a rounded top, a scalloped edge, or one of several custom shapes is chosen by some brands for a more unique look, including die-cut cards that stand apart on a shelf.
To understand how to design professional earring backing cards? It is important to always start by choosing the right size and shape correctly. Once the right size and shape have been decided, understanding how to design professional earring backing cards becomes easier as the next building block is explored.
Step 2: Select Premium Material And Texture
The material of a card is chosen based on the look the brand wants to create. How to design professional earring backing cards for brands is important to know especially that want a clean, modern look often choose matte white or matte black cardstock, while those chasing a brighter, more reflective finish opt for a gloss finish. For a more premium feel, a textured or linen cardstock is often used. Many other options include kraft paper materials that are used to create them for the eco-friendly appeal of the brand by customers. To explore eco-friendly and durable packaging options, check out Kraft Paper Earring Cards for a natural and premium look.
- Kraft cardstock: Between 80lb and 100lb weight, this option is selected for a rustic and natural appearance favoured by handmade brands.
- Matte cardstock: White or black matte finishes are picked by brands that want a clean and modern look on the shelf.
- Textured cardstock: A linen or textured surface is often used when a more premium feel is the goal. When design how to design professional earring backing cards, they matter a lot.
Step 3: Add Secure Holes In The Right Position
Holes typically depend on the size of the cards, but mostly they are punched at around 1/16 inch in diameter, spaced about 1 inch apart and 3/4 inch from the edge of the card. The right hole size is selected based on the type of jewellery, with smaller holes used for lightweight earrings and pins, and slightly larger holes used for heavier pieces such as rings and necklaces.
Consistent placement is maintained across every card, as a fixed hole position allows the earrings to be set in the same spot on each card, keeping the display uniform. Designing effective Earring Card Holders follows the same principle, where method and presentation work together to increase visual impact. This ordered approach is central to how to design professional earring backing cards.
Step 4: Design Attractive Branding Artwork
Branding artworks are what turn a plain card into a recognizable part of a business, and thoughtful logo placement is the core of this step. A logo is usually placed at the centre or top of the card, since this is the first thing a customer notices. Earring Tags are also used by some brands as an alternative labeling option for pricing, branding, or information. Moreover, a website link, a QR code, or a social media handle is also included by many brands so customers can find them again easily, and some sellers add barcode placement on the reverse side for explaining information. Strong branding is a core principle in how to design professional earring backing cards.
“My motto is strong packaging, clear addressing.” — Halldór Laxness
Step 5: Create Professional Layout Design
A clear layout is what makes a card easy to read and pleasant to look at, and it sits at the centre of professional design. Extra information is placed below the name in a smaller font so it does not distract from the main design. A clean layout also adds to the overall shelf appeal of the product once it is placed on a shelf or in a photo. This structured approach is central to how to design professional earring backing cards. At this stage of how to design professional earring backing cards, choosing the right printing method ensures design accuracy and consistency.
To see what the result is after designing that packaging, explore Benefits Of Custom Earring Cards For Jewelry Brands and know the advantages you get after making these backing cards
Step 6: Pick A Reliable Printing Method
The custom printing method is selected based on the order size and budget. Digital printing is usually chosen for small or medium batches, since it is fast and does not require large minimum quantities. Offset printing is selected instead for larger orders, since the cost per card becomes lower as the quantity increases. A print is often designed before full production, just to confirm the colours appear as expected. Printing decisions are an important part of how to design professional earring backing cards at production level.
- Digital printing: Chosen for small or medium batches, since it is fast and does not require large minimum quantities.
- Offset printing: Selected for larger orders, since the cost per card becomes lower as the quantity increases.
- Screen Printing: Selected for bold, solid colours, especially when a simple logo or single-colour design is required on thick cardstock.
After the printing method has been picked, finishes and quality checks are made next steps in that blog of how to design professional earring backing cards.
Step 7: Selecting The Right Finish
Spot UV, foil hot stamping, and matte or gloss lamination are a few of the popular finishes in the final steps of how to design professional earring backing cards. The right finish is selected based on the visual style and branding requirements of the product.
1. Matte Finish
A soft, non-reflective surface is created through a matte finish, which is mostly used for earthy, minimalist, or handmade jewellery brands.
2. Gloss Finish
A shiny, vibrant surface is achieved through a gloss finish, that is associated with a more vivid and professional appearance of the colours on the card.
3. Spot UV
Selected areas such as a logo or text are highlighted through spot UV, where a glossy contrast is created against a matte background to draw attention to key design elements.
Foil Stamping
A premium, eye-catching effect is achieved through foil stamping, where gold, silver, or coloured foil is applied to elevate the perceived value and identity of the brand.
Smart budgeting is also part of how to design professional earring backing cards?
Step 8: Test Sample Before Final Order
A sample is requested before the final order is placed, since this step helps catch problems early. The colours on the sample are compared with the original design file, just to confirm nothing looks different once printed. The hole and slit placement is also checked on the sample, ensuring the earrings sit and hang correctly.
The sturdiness of the material is tested by hand, so any concerns about long-term durability are addressed before a large batch is committed. This step is small, but it can save both money and time if an issue is found early, ultimately protecting the experience customers have once the cards reach their hands. Testing is an essential part of how to design professional earring backing cards, as the final product is ensured to meet expectations without surprises.
If you need expert support or custom packaging solutions, you can contact Canada Custom Packaging to bring your earring card designs to life with professional quality and branding precision.
Conclusion
From choosing the right size to picking a trusted supplier, the overall quality and identity of the final product are shaped by each decision. Small details, like hole placement or care instructions, are often what customers remember most. When these eight steps are followed carefully, a simple card is turned into a powerful branding asset that supports every sale. In the end, a strong identity of the brand is what simple packaging is transformed into, through mastering how to design professional earring backing cards.
Frequently Asked Questions (FAQs)
What size works best for an earring backing card?
In how to design professional earring backing cards, a size of 2 inches by 3.5 inches is most commonly used, though smaller cards like 2 inches by 2 inches work well for any earring display.
Which cardstock material suits earring backing cards?
As we discussed in the above blog of how to design professional earring backing cards, Kraft cardstock is popular for a handmade look, while matte white or matte black cardstock is chosen for a more modern appearance.
How many holes are required on an earring card?
Two holes, spaced about 12 to 15 millimetres apart, are usually enough for standard stud earrings.
Why is a sample print needed before a full order?
In how to design professional earring backing cards, it is discuss then when you design them with a supplier rather than yourself a sample helps confirm that colours, hole placement, and material sturdiness all match the original design before a large quantity is produced.
Can earring backing cards be customized with a logo?
Yes, a logo, name, and even a custom shape are added to most cards, and finishing touches like foil stamping or embossing are also chosen to match the overall look of the brand.
What is the difference between digital and offset printing?
Digital printing is chosen for small or medium batches since it is faster and requires lower minimum quantities, while offset printing is selected for larger orders because the cost per card drops as quantity increases.
Is a minimum order quantity required by most suppliers?
Yes, most suppliers set an MOQ, and this is checked early to ensure the budget and expected sales volume are aligned.
Are care instructions necessary on the back of a card?
They are optional, but short tips like keeping jewellery away from water are often appreciated by customers and help improve brand perception.
How is the right supplier chosen for printing these cards?
When wondering how to design professional earring backing cards and then select the supplier based on quality, turnaround time, communication, customer reviews, and samples of past work, Universal Packaging is usually checked before making a final decision.